Insert

CubePDF Utility allows you to insert the following files into a PDF file.
To insert a file, specify the insertion position using the one of following four menus displayed in the upper menu or context menu.
- Insert or Insert behind selected position
- Insert at the begining
- Insert at the end
- Insert at other position
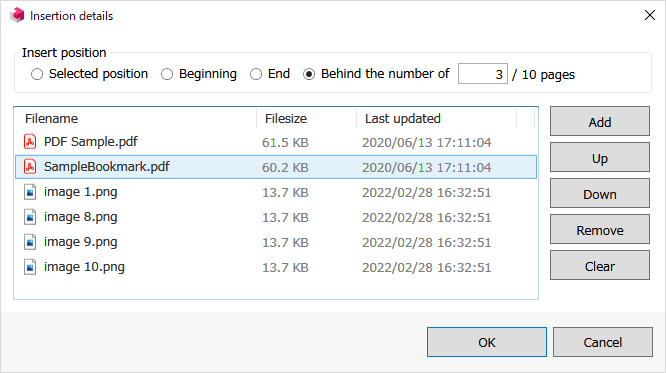
When Insert at other position is selected, the following dialog will be displayed to set the insertion position and the files to be inserted. Otherwise, a system dialog for selecting files will be displayed.
Insert by Drag&Drop
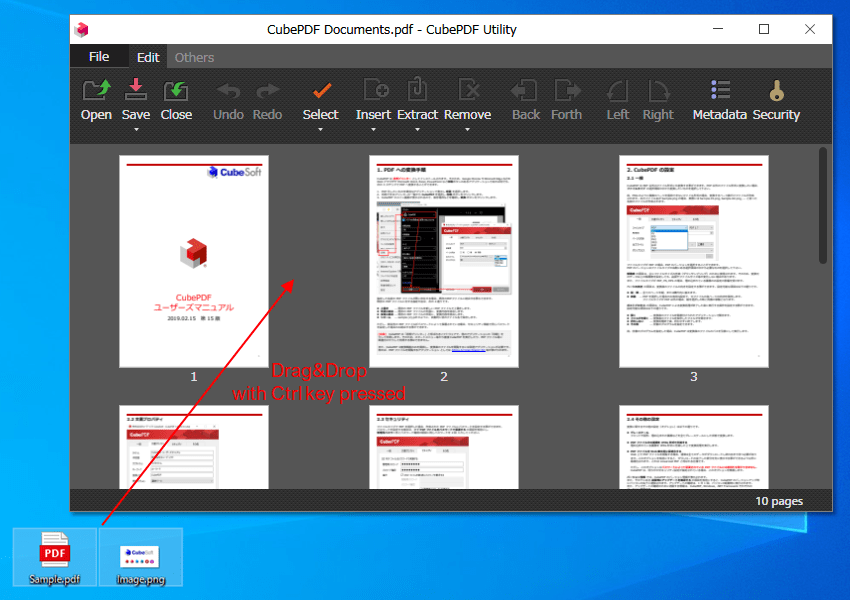
In CubePDF Utility, you can also insert a file at the end by Drag&Drop with the Ctrl key pressed. (This feature was introduced in 2.0.0.) Note that if you Drag&Drop a file without pressing the Ctrl key, the file will be opened in a new window.
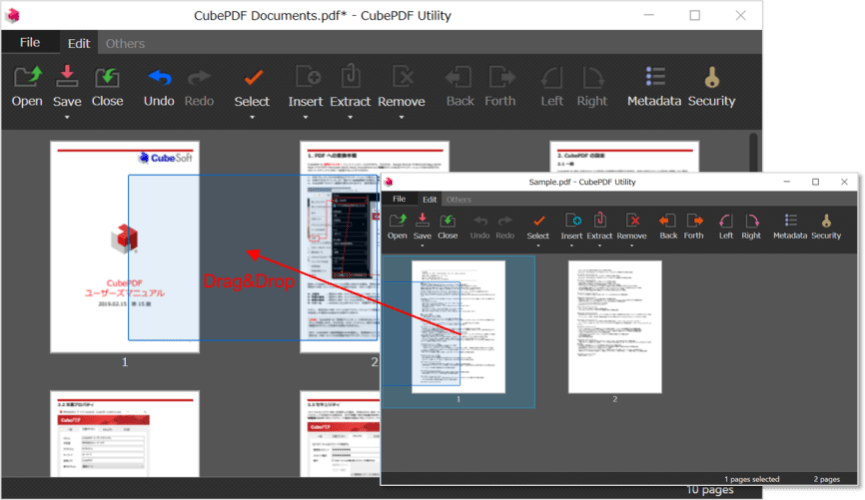
Insert by pages
In CubePDF Utility, you can also insert PDF files by pages. To insert a page by page, first open both the source and destination PDF files in CubePDF Utility. Then, Drag&Drop the thumbnail images of the pages you want to insert.
Remove
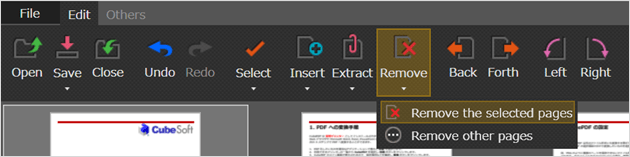
The Remove menu allows you to remove some pages of an opened PDF file. When you select Remove or Remove the selected pages menu, the currently selected pages on the main window will be removed. Also, if you select the Remove other pages menu, the following dedicated dialog will be displayed.

Target pages should contain the range of pages to be removed. The allowed characters are numbers, "," (comma), and "-" (hyphen) (e.g. 1,2,4,7-9).
Extract
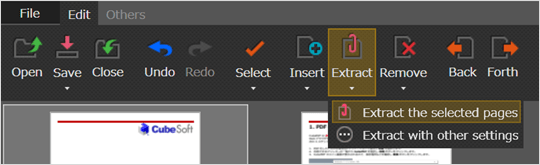
CubePDF Utility allows you to extract any page in a PDF file and save it in the PDF or PNG file formats. Note that if you select the Extract or Extract the selected pages menu, the saved format will be PDF. If you want to extract in PNG format, please make the necessary settings in the following dialog after selecting the Extract with other settings menu.
Extract as PNG file format
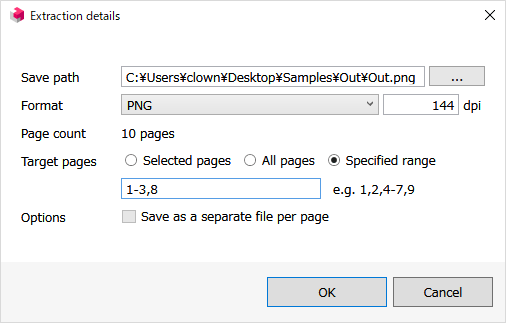
In the Save path section of the dialog, set the path where the extracted results will be saved. For Format section, you can select either PDF or PNG. If you select PNG, you can set the DPI. This value is used to determine the size (width and height) of the PDF content when it is converted to bitmap format. For example, if you want to convert an A4 size PDF file, the width and height will be as follows, depending on the DPI setting.
- 72dpi ... 595 × 842
- 96dpi ... 793 x 1122
- 144dpi ... 1190 x 1684
- 300dpi ... 2479 x 3508
For Target pages, select from Selected pages, All pages, or Specified range. When Specified range is selected, the text box at the bottom will contain the range of pages to be extracted. The allowed characters are numbers, "," (comma), and "-" (hyphen) (e.g., 1,2,4,4). 1,2,4,7-9).
If the Save as a separate file per page option is enabled, for example, extracting a 10-page PDF file will generate 10 PDF files. In this case, the file name of each generated PDF file will be the one specified in Save path with a number added. For example, if you specify the file name "Sample.pdf", the generated PDF files will be Sample-01.pdf, Sample-02.pdf, and so on. If you specify PNG as the format, the same behavior will occur.
Reorder (Move)
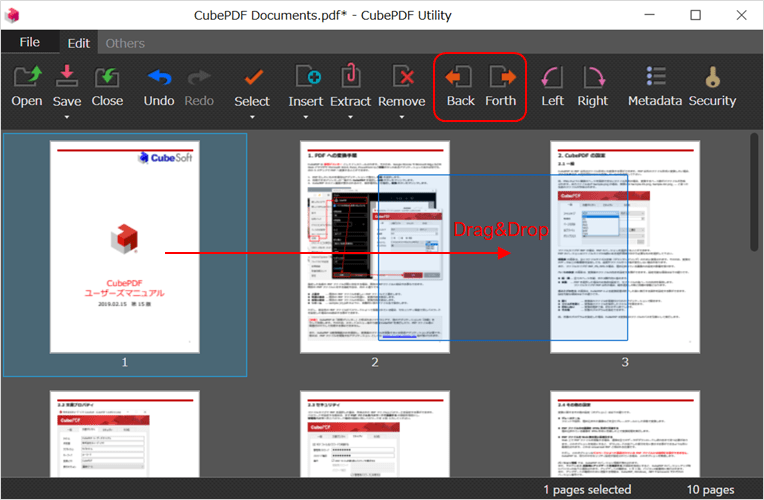
The Forth and Back menus allow you to move the currently selected page in the main window forward or backward by one page, respectively. The page order can also be changed by Drag&Drop operation. Select the pages you want to change, and then Drag&Drop them to the target position.
Rotate
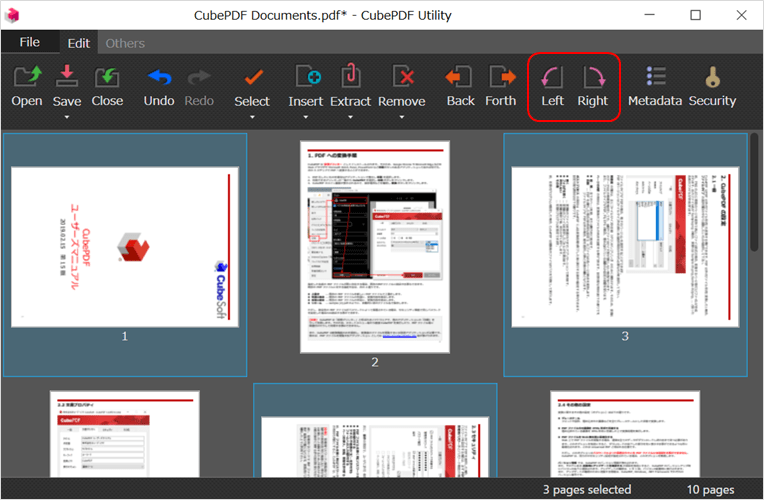
The Left and Right menus allow you to rotate the currently selected pages on the main window left or right by 90 degrees, respectively.
Metadata
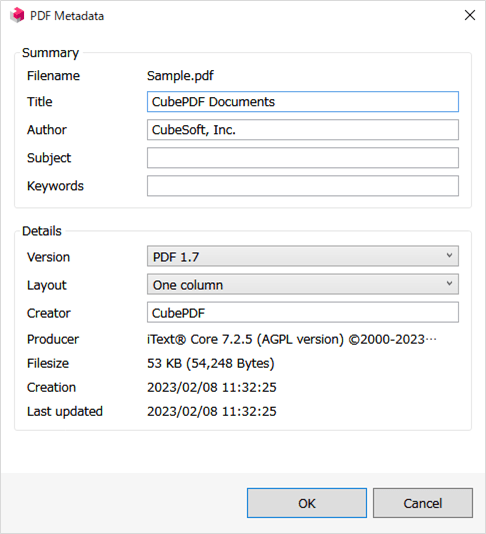
In the Metadata dialog, you can register information such as the title and creator. The information registered here can be viewed in the properties dialog of PDF viewer such as Adobe Acrobat Reader DC. In addition, the Layout item allows you to change the way the document will be displayed when opened in PDF viewer.
Security

In the Security dialog, you can protect the PDF file with a password. To set a password, first enable the Encrypt the PDF with password option, and then enter the same password twice in the Password and Confirm fields. Currently, four encryption methods are supported: 40-bit RC4, 128-bit RC4, 128-bit AES, and 256-bit AES.
In the Operations item, specify the operations to be allowed or restricted to users. The following items can be set.
- Open with password
- Allow printing
- Allow copying text and images
- Allow inserting and removing pages
- Allow using contents for accessibility
- Allow filling in form fields
- Allow creating and editing annotations
Attention about password sharing
if you enable the item Open with password and also enable the item Use owner password, CubePDF Utility will set the same password as the owner password for user password.
However, if you share both passwords, the restrictions on printing and copying operations may not work properly depending on the PDF viwer. This is probably because the PDF viewer recognizes that the PDF file was opened with the owner password. For this reason, CubePDF Utility is designed not to accept permission settings when it is shared with the owner password.
Moreover, if a PDF file is recognized as having been opened with the owner password, all PDF editing, including removal of the user password, will be possible. Please make sure you fully understand these behaviors when you share the user password with the owner password.
List of keyboard shortcuts
The keyboard shortcuts available in CubePDF Utility are as follows.
- Ctrl + O ... Open PDF file
- Ctrl + S ... Overwrite
- Ctrl + Shit + S ... Save as
- Ctrl + W ... Close the PDF file
- Ctrl + Q ... Exit the application
- Ctrl + I or Insert ... Insert PDF, PNG, JPEG, or BMP file at the selected position
- Ctrl + Shift + I ... Insert at other position
- Ctrl + D or Delete ... Remove the selected pages
- Ctrl + Shift + D ... Remove other pages
- Ctrl + E ... Extract the selected pages
- Ctrl + Shift + E ... Extract with other settings
- Ctrl + B ... Move the selected page forward one page
- Ctrl + F ... Move the selected page back one page
- Ctrl + L ... Rotate the selected page 90 degrees left
- Ctrl + R ... Rotate the selected page 90 degrees right
- Ctrl + M ... Show the Metadata dialog
- Ctrl + K ... Show the Security dialog
- Ctrl + A ... Select all
- Ctrl + Z ... Undo
- Ctrl + Y ... Redo
- Ctrl + + ... Zoom in the thumbnail size
- Ctrl + - ... Zoom out the thumbnail size
- F1 ... Show CubePDF Utility Documents